Navigating TCW Platform
The Connected World Map
When you first log into “The Connected World” platform, you are presented with a flat map view as shown in the example below.
 |
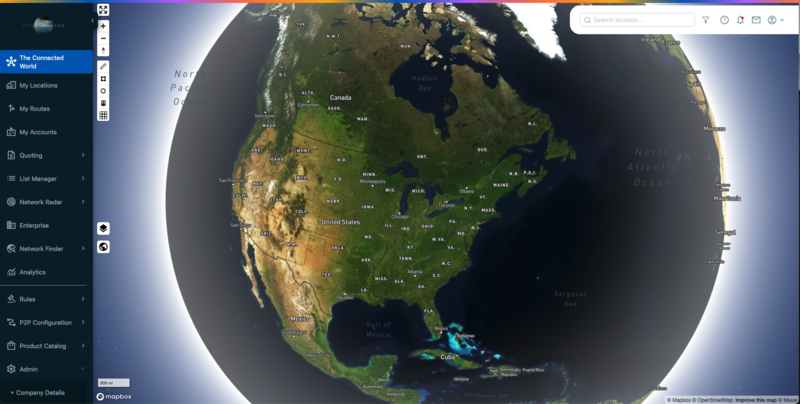
You can switch to globe map view by clicking the globe icon  and explore the TCW Map in Globe View. With the Globe View option enabled, you can select Satellite, Streets, or Outdoors providing more flexibility in viewing locations as shown in the below example.
 |
Note
you can easily grab latitude/longitude and GLID data by right-clicking on a location on the TCW map. A right-click drops a pin on the map and displays a dialog box with coordinates and Global Location ID (GLID) information for a specific location. You can click on " " button to add this location to "My Locations".
The following zoom tools are provided in this order from top to bottom in the upper left corner of the page.
Icon | Zoom tool | Description |
|---|---|---|
| Enter full screen | Use the crossbar icon to enter full screen view. |
| Zoom in | Use the + sign to zoom in on a parcel and clustering of location data. |
| Zoom out | Use the – sign to zoom out for more specific granularity. |
| Pan/Tilt | Use the up and down arrows to pan (tilt) your map view. Then click again to return map view to true north. |


The following map tools are provided in this order from top to bottom.
Icon | Map tool | Description |
|---|---|---|
| Measure tool | Click the Measure tool (ruler) to draw a line that displays distance (Metric or Imperial system, depending upon the company default attributes setting) and enables you to save to a new route. The “Total distance” is related to the line which is drawn on the map and the “Save Route” button lets you save it to a new or existing route in My Routes. |
| Polygon tool | The polygon tool is tied to the Market Explorer module. Click the polygon tool to draw a polygon on the map and view pop-up data for all buildings (and tenants if you have Building Intelligence enabled) within. Once you draw the polygon, you can click on it/select it to move it to another location on the map. The ruler measurement remains on the map when you create a Polygon allowing accurate distance measurement around the KMZ You can use polygon and ruler tools at the same time on TCW map to measure distance between any two points. |
| Circle Tool | Click the Circle tool to draw a circle around a select location(s) on the map. A popup dialog box shows the radius and diameter of the circle. Below dialog box will show Tenant and Building Results based on that radius. |
| Delete tool | Click the Delete tool to select and delete any of the drawings that you have added to your map. |
| Show grid plus code | Click the Show Grid plus Code to turn on the plus code grid as a base layer, a reference for the market grid. |
| Map view tool | Click the map view icon to change your map view to Satellite, Streets or Outdoors. |
| Globe view tool | Click the globe view icon to change your globe view to Satellite, Streets or Outdoors. |


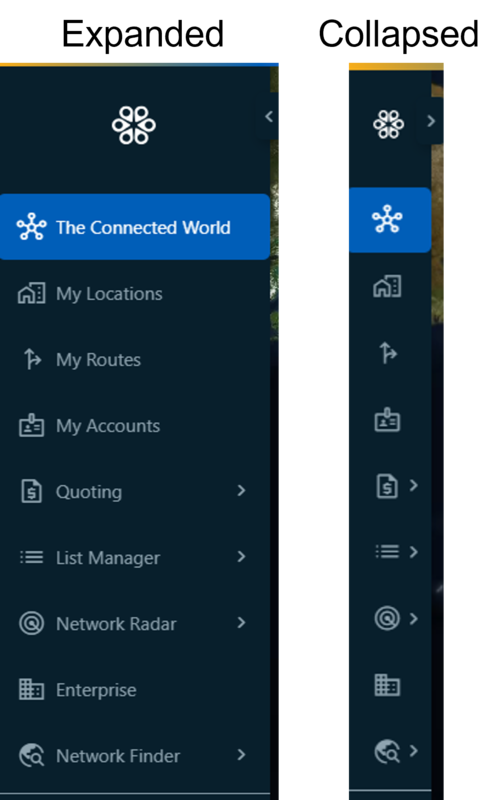
Depending upon the modules that you purchased, the navigation bar will show the subscribed modules in the sidebar as shown in the example below. The menu is collapsible, by clicking on the < arrow at the top right beside your company logo. Once collapsed, click the > arrow to expand the menu back to the full menu size. To see a listing and description of all available modules, see Connected World modules.
 |
 |
Click inside the search bar to access the search capability. You can search by Location or by Coordinates using this search bar.
Within the search bar, you can enter a specific address to find the location on the map. The primary address search options include address, city and/or state. For best results do not use abbreviations.
Note
The system search does not recognize postal code-only entries.
As you enter information into the search bar, the system displays predictive results that most closely match what you are typing and auto populates the field with that information.
 |
If you prefer, you can enter a Lat/Long into the Search bar and the system will attempt to resolve the Lat/Long to an address within your My Locations instance. The Latitude and Longitude coordinates must be separated by a comma with no space in between. For example, 42.276488, -71.570729 will bring up “134 Flanders Rd, Westborough, MA 01581, United States” as shown in the below example.
 |
If no address match is found within your My Locations instance, you can use the Coordinates to find and zoom into the location on the map.
Based on your completed search criteria, the search result zooms to the center point of the location on the map view.
The TCW Map Network Path Search function allows you to efficiently find the shortest Fiber Route between any two locations (A and Z) within a specific supplier's network. In addition to visualizing the shortest path on TCW map, you can download the results or merge them into My Layers. This feature aids in network planning and service provisioning, while also enhancing platform usability and encouraging user engagement. Please contact your sales representative if you want to enable this feature within your instance.
Requirements for Network Path Search Feature
This feature requires company level subscription and it should be enabled by a Connecbase administrator to be available for the users.
Once enabled, a toggle button "A-Z" displays on the left side of the search bar as shown below.
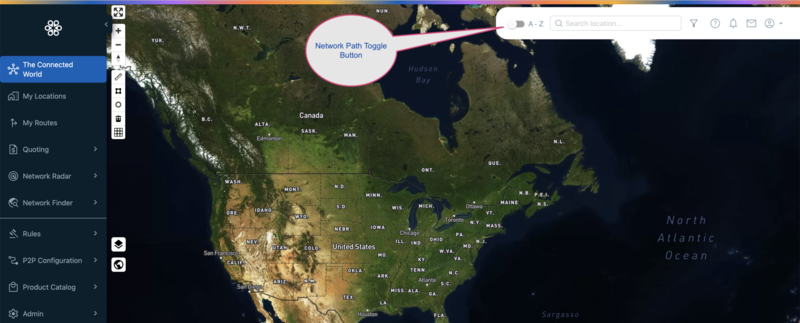 |
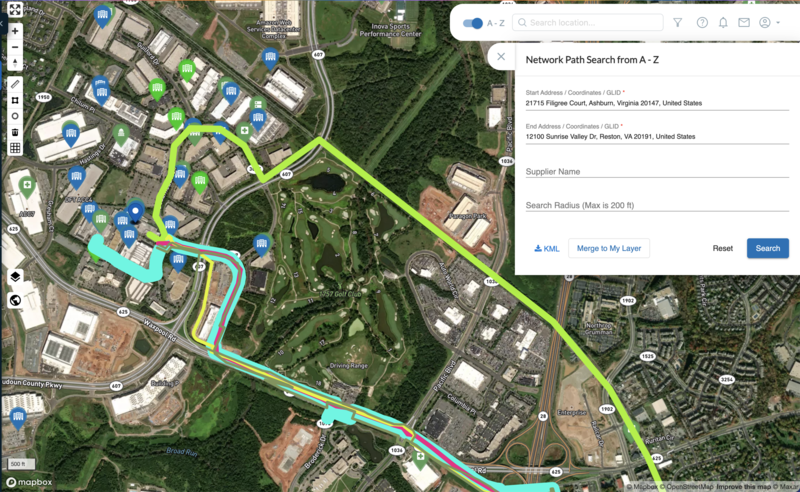
Clock the Toggle button to turn "ON" Network Path search functionality. When turned "ON", a dialog box displays with the following parameters (Fields):
Start Address / Coordinates / GLID: Required field auto populates when you start typing an address.
End Address / Coordinates / GLID: Required field auto populates when you start typing an address.
Supplier Name: Optional field. You can enter a specific supplier name for filtering the results
Search Radius (Max is 200 ft): Optional field. You can specify a specific radius up to 200 ft.
Note
You can use either of the three options for start and end fields.
Example: If you decide to use pair of coordinates for start field, use the pair of coordinates with comma separated value e.g. 41.853686, -87.618359. If you decide to go with an address for the "End Address" field, start typing the address and choose from the dropdown auto populated options. You can use any of the three options for start and end address fields.
Use Comma separated values for coordinates if you decide to use coordinates for start and/or end addresses as shown below:
Start: 41.853686, -87.618359
End: 39.615064, -74.32883
Below is an example of filled Network Path query form using address in the "Start Address" field and coordinates in the "End Address" field:

Click the "Search" to search the Network path on TCW map.
System searches for the available path(s) and zooms in to the start address as shown in the below example:
Note
You can zoom out the map to see full path using map zoom tool. To keep the path displayed, don't turn off the A-Z toggle button. This will turn off the form and searched path from the map. Click on a route to see the supplier name of a particular route.
You can do the following, once you get the network path is mapped:
Zoon in/out using the zoom tool.
Download the KML file.
Merge the results in "My Layers".
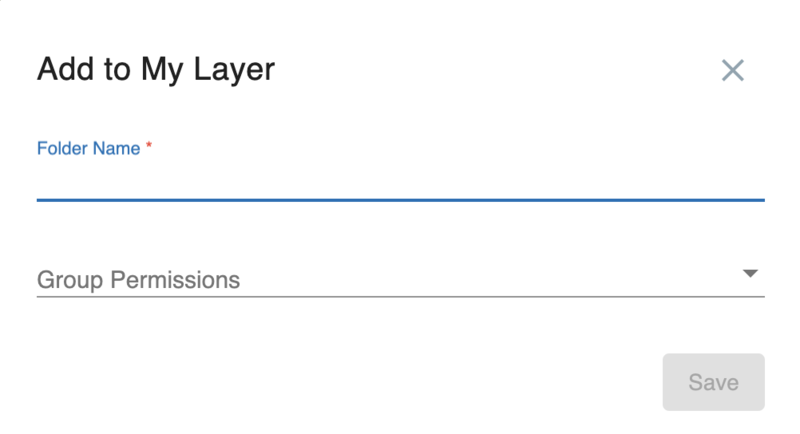
Clicking the "Merge to My Layers" button open a new dialog box as shown below and you can add the search results into "My Layers" by providing the folder name and assigning group permissions if applicable.
Below example shows different option that you can use after searching the desired network path.

Clock "A-Z" toggle button to turn off the Network Path Search form. This will erase any searched path from the map.
Map Filters icon 
From “The Connected World” map page, Map Filters  help you refine and/or limit the results viewed on the map. Map Filters also provides access to the “My Layers” function, and depending on your user entitlements, may also provide access to Market Explorer.
To access Map Filters, click the Map Filters icon that appears next to the search bar at the top right of the map page. Within the Map Filters, you can multi-select anything within a grouping, type of connection, access medium, etc.
Lists are restrictive, meaning that you do not need to check every box. If all boxes are left blank, all available data is presented exclusive of any filtering.
Filter | Description |
|---|---|
Buildings | Enables you to select or deselect specific configurations you wish to view on the map, including building categories, distance band, competitive ratings, and custom fields. NoteFor custom fields, users can click the drop-down menu to select from the available options. Also, the search value at the top of the drop-down menu to quickly locate a specific custom field name in the list. |
Networks | Enables you to select or deselect specific route configurations you wish to view on the map. |
Circuits | This function displays if you are a registered user of Network Radar. It enables you to select or deselect specific circuit configurations you wish to view on the map. |
Market Explorer | This function displays for only those registered users of Market Explorer with user-level entitlement only. Market Explorer strengthens the sales targeting efforts of network providers by enabling users to customize search parameters for any location or set of locations in a specific market. |
My Layers | Enables you to create your own hierarchical folder structure and upload data sets to organize and maintain data that is specific to your needs and business role. |

Click the Notifications icon  to view a list of activity notifications within the platform for your instance. The number shown in the red circle indicates the number of unacknowledged activity notifications available for review.
Within the Notifications page, you can select some, or all, notifications and either click Update Selected as Read to maintain the notification or click Delete Selected to remove the notification(s) from the list.

Click the Messages icon  to communicate with other users in the instance. Clicking this icon displays the list of all users in the instance. You can select any user from the list and send a message to the selected user.

Company & profile menu icon  displays the company name, instance ID, username, role, and other options as displayed in the below table:
Field Name | Description |
|---|---|
<Company Instance Name> | Company Instance Name |
<1234> | Instance ID |
<User Name> | Username |
Administrator | User role |
Profile | The Edit Profile dialog box displays where you can view or edit your personal account information. |
About | Displays the current software version, privacy policy, and terms of use. |
Feedback | Opens the Feedback form to send feedback to a TCW administrator. You can attach documents or files as needed to provide additional information. This action automatically generates a support ticket within the Connectbase support system. |
Reset Password | Displays the Reset Password dialog box where you can enter a new password and confirm the new password. |
Change Company | If a user is connected to more than one instance, you can switch between the instances using this option. |
Logout | Exits the platform. |
On the map view, icons and routes are color coded to aid in visual identification and the building map icons dictate the building category. When you click on a specific building icon, the building information pop-up window displays.
The following tables define the building icon colors, building categories, and pop-up building information functions.
Building icons - color-coded legend
The color of the building icons indicates the state of connectivity. These colors are stagnant and are not customizable.
This color | Indicates this connectivity status |
|---|---|
Dark Blue | OnNet, Connected |
Dark Green | Near Net, Not Connected |
Light Blue | In progress of becoming OnNet |
Light Green | Planned |
Red with bullseye | Prospect |
Orange | Indicates one of the following conditions:
|
Building icon categories
The building map icons indicate the building category.
Building icon | Building category |
|---|---|
| Commercial building |
| Data center |
| Health care facility |
| Government building |
| Residential building |
| School/University |
| Wireless |
| Multi classification (For example, Commercial building and Health care facility) |


When you click a building icon on the map, the Building Information pop-up dialog box displays, showing the address, the customer name, along with the access medium and status of the selected building. From the pop-up dialog box, you can click any of the following options for the respective action.
Note
When you navigate away from the Building Information pop-up dialog box by clicking on the Building icon, for example, a Back button is provided, so that you can easily return to this location on the map.
Icon | Description | Action |
|---|---|---|
| Magnifier | Click the Magnifier icon to view the Network Intelligence data (Telco, CableCo, Network Providers). |
| Check mark | Enables you to set a building as the default building on the map. Left click the building you want to mark as your default building, then click the checkmark. The check-mark changes to a double checkmark to indicate that this building is the default. The program will then open to this site every time you login. |
| Flag | Click the Flag icon to send a message to Customer Support regarding building updates or discrepancies. |
| Star | Click the star icon to save the building to your Favorites. Favorites are located in the My Locations Menu by selecting the icon in the upper right corner to display only your saved Favorite building locations. Favorite building locations are also identified in the third column of the My Locations page, indicated as Orange in color. |
| Dollar sign | This icon appears only if you have CPQ enabled. Clicking this icon loads the CPQ Quick Quote functionality and automatically loads the address into the user interface. |
| Building | Click the Building icon to view building details, products, and building reference information. In cases where a building has more than one associated Access Medium and Connection Status, the information dialog box displays both. For example, when a location has both OnNet and Near Net available. |
| Pencil | Click the pencil icon to update building information, provided you have Edit User or higher privileges. This icon does not display for View only users. |


